Saturday 16 November 2019

Inspirational Swift boxes in Segovia

Thank you to Javier Saez Frayssinet for sending these pictures of the nicest installation of integral Swift boxes that we have seen. Hopefully this will demonstrate to architects just what is possible with a little imagination.

In Javier's own words:

This is a story about a renovation of the facade and interior of a building located on Juan Bravo Street, within the historic city centre of Segovia.

A colony of Swifts nests every year on this facade. Under each balcony there was a corbel and the Swifts took advantage of the gaps between them.

When the renovation began, I was on vacation. When I returned to Segovia I found that scaffolding and a protective net had been installed.

I watched as the swifts tried to enter their old nests but the netting prevented it.

I contacted the local authorities and the owner of the building, who decided to lower the netting to the 2nd floor. As this new arrangement was not enough I spoke with the owner again and the netting was lowered further to the 1st floor where the swifts were not nesting.


Because there was now a risk that rubble could fall on pedestrians the architect decided to stop the renovation until after the swifts had finished nesting.

The Swifts returned to their nests and successfully raised their chicks.

In order that in future years the swift colony would continue in the building, different alternatives were studied and it was decided to make nest places of plaster. The inside of each new corbel was divided into two parts with a plaster partition. The length of each nest chamber is 70cm, depth 17cm and height 15cm.

We think that it is a good solution for historic or modern buildings that have this kind of facade. The protection of a swift colony has been combined with the renovation of a historic building, resulting in a very pleasing solution.

Now we hope that when the swifts return at the end of April 2020, they will find the new homes we have built to be attractive.

The realization of this project was possible because the architect, Carlos Martin, enthusiastically received our proposal to make the nests. The construction manager, Vinut Calmorot, installed the corbels and made entrances, using the formers that Dick Newell had sent us (for this project). The interior division meant that under each balcony there are two nests available for swifts.


In addition to the 16 Swift boxes that you see here, another 5 have been installed on the roof.
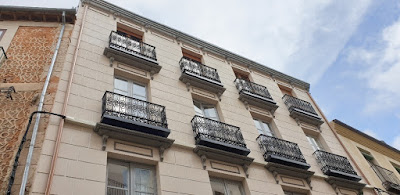
16 Swift boxes


How neat is that!


Thursday 17 October 2019

Dark versus light interior experiment

This post is more about trying to persuade people to do similar experiments than publishing a conclusive result.

A point of debate has been whether it is a good idea to paint the inside of a Swift box black or to leave it unpainted. Two years ago we erected a 10-box triangle (apex box) at Trumpington Meadows Nature Reserve and we painted half of the chambers black inside (see here).


When we recently inspected the boxes, we found evidence that Swifts had explored all 10 chambers, they had built nests in 5 boxes and had bred in 4 of them. With the boxes numbered from the top down and from left to right, the occupied boxes were 1, 5, 7, 9 and 10. They did not breed in 1. Of these 5, 4 are unpainted and only 1 is painted (10). [In addition a pair bred in the Starling box that you can also see in the above picture - this was unpainted inside, but is not included in the analysis below].

The probabilities of randomly distributing 5 pairs of Swifts in 10 nest boxes, half painted black would be:

B = black, W = unpainted
5B + 0W = 0.4%
4B + 1W = 9.9%
3B + 2W = 39.4%
2B + 3W = 39.4%
1B + 4W = 9.9%
0B + 5W = 0.4%

So the probability of 4 or more pairs occupying unpainted boxes is 10.3% (9.9% + 0.4%)
It needs to be less than 5% to be called "statistically significant"

We don't need many more experiments like this with a similar result to get a definitive answer.

Friday 6 September 2019

Swift brick camera box

We were asked about cameras in Swift bricks installed to mitigate loss of nest sites under eaves in a hip to gable roof conversion.

Ten Swift bricks will be installed, 6 S Bricks high up in the new gable and 4 custom-built Swift bricks with cameras at the same level as the original eaves.

Most Swift bricks are too small to accommodate a camera, and are not constructed for easy access for maintenance.

The situation is a cavity wall 30cm thick, where access to the boxes is required from inside the building. The outside wall is rendered. We decided to make something to satisfy these requirements:
  1. A material that could take rendering
  2. White lights in the box requiring placing the sensor outside
  3. A box large enough so that the camera could see the whole stage, without Swifts wandering off stage
  4. Access from inside the house.
This idea may well be beyond most DIY enthusiasts, unless you have the right tools. In our case a water tile cutter and diamond hole saws. You also need to make some jigs to hold things in place.

We used:
  • 5mm cement fibre board (aka undercloak or soffit board) for 5 walls of the box.  This comes in strips 15 cm wide. The inside wall is plywood.
  • A cast half brick entrance piece to get the entrance clear of the rendering.
  • A 9mm (internal) plastic tube protruding beyond the rendering for the white light sensor.
  • Cameras and white lights were obtained from Green-Feathers.co.uk
We considered 2 glues to assemble the box: Gorilla Glue and Stixall Extreme Power Adhesive. Either could do the job:
  • Gorilla Glue is more expensive but is easier to apply and goes off in about 15 minutes
  • Stixall is cheaper, but takes longer to apply and longer to go off.
We used Gorilla Glue to assemble the box and Stixall for the half brick entrance.

This Swift brick will occupy the outside 18cm of the 30cm wall, leaving 12 cm for temporary insulation between the back of the box and the room inside.

It may also be worth reading what we did here.

Cast entrance piece, cement fibre-board and plywood body.
Note plastic tube bottom right containing the white light sensor.
Access door for simple inspection and maintenance. Removable back for more radical maintenance
Internal dimensions L 34cm W 15cm H 14cm.  The sloping platform is 14cm long at 45°.
The cabling is tucked away beneath the sloping platform. 
The camera has a 2.8mm lens.
The platform is not glued in, it is easily lifted out with the camera and lights
Inside view. The sloping platform keeps the birds on stage


Thursday 5 September 2019

Peak Boxes

We thought it worth publicising a relative newcomer on the Swift nest box market. Lester Hartmann has brought the world of CNC machining to making high precision nest boxes. With a career in building custom furniture he is well qualified to do so.


At Action for Swifts we have focussed on generating ideas, trying them out with amateur carpentry, then describing them as case studies on this blog. We are rather pleased that this has influenced not a few Swift boxes now being offered commercially. Some of our ideas are borrowed, then developed from the Dutch website
https://gierzwaluwbescherming.nl/bescherming/nestkasten/.
The Dutch were always a little ahead of us.

It is good to see Peak Boxes taking this forward, developing and improving on what has gone before.

Peak Boxes products are of the highest quality and should make a very worthwhile contribution to the recovery of Swifts. You can see all the Swift boxes here:
https://www.peakboxes.co.uk/shop-swift-boxes

Every effort is made towards being carbon neutral – the raw material is Duraply; plastic is not used in packaging and shipping is with DPD who claim to be carbon neutral.
3-tier apex box

Saturday 3 August 2019

Crumlin Swift Tower, a history

For a while now, we have been cautious about encouraging people to put up a Swift tower, because they are relatively expensive and there are so few case studies demonstrating success. Our thoughts are summed up here. So we very much welcome this contribution from Brian Cahalane of his experience with a Swift tower in his garden and how he made it a success.

Paddy and Sean arrive with tower from Stonyford Engineering
In 2017, having designed the Stoneyford Swift Towers a few years previously, I decided to install a mini one in my back garden.

I wanted to find out for myself how useful they would be, and was it really as difficult to attract Swifts to nest in one as some people think. 
Camera  and speaker cable runs down the pole
then ducted underground to the garage


I did, I suppose, have the advantage of a large colony at my house as well as mains power close at hand.

I began playing calls in late April of that year and by the middle of May, single birds were going into some of the boxes. This was the pattern for the rest of the season. 

In 2018 I revamped the roof, the internals, and the entrances as I wanted the tower to look more aesthetically pleasing.

By the middle of May four pairs had taken up residence, two pairs were not in camera boxes so I couldn’t be sure of breeding until later on when I saw the parents going into the boxes with food. The other two pairs in the camera boxes were breeding, single birds were going into other boxes all season. 

In 2019 I installed extra cameras and 7 pairs have bred, all the other 5 boxes now have pairs and I wouldn’t be surprised if there were twelve pairs breeding next year, I didn’t play any calls this year, however I did for the previous two years, the calls had no affect on the breeders at my colony even though the tower is only 30 metres away. 

What have I learned?

Calls need to be played, ideally from 4.00 am to 9.00am and from 9.00pm to 11.00pm in
May, June and July.

Towers need to be monitored to ensure this. A timer is essential.

[Eds: As sunrise and sunset change with latitude and longitude, maybe the simplest way of describing Brian's timings in a location independent way is:
From dawn for 5 hours and for 2 hours until dusk
You can find the times of dawn and dusk from websites such as:
https://www.thetimeandplace.info/
A reasonable compromise date for the whole season is 1st June ]


Top floor of 3 floors. The tower is 19" square, each nest chamber is L 12" x W 6" x H 6"
The central square holds cables for the tweeter and cameras

For protection of entrances, we used Marshall Tufflex half round gutter 114m from Amazon

Revamped tower
TV screen in the garage with MP3 player on the shelf
The single egg laid on 29th May resulted in a fledged chick on 29th July

Tuesday 30 July 2019

Innovative use of a cavity liner

When one installs internal boxes, one should try to either make them unobtrusive or an attractive feature.

One of the first internal swift box projects we did in 2014 used a 30mm wide cavity liner which we cut into pieces and then reassembled into a half-brick entrance (see here).  Then in 2016 Barbara Wager installed internal boxes in a stone wall with a system of entrances cast in situ (see here).

Here, Barbara has combined these 2 ideas resulting in a practical solution that is simple, effective and attractive.

In her own words:


"The nest boxes were made by taking out facing stones, inserting the vent brick slices, mortaring in with tiles over the entrance and then vaselined formers were mortared in. Inside they are quite roomy and the walls mortared to prevent chicks wandering into the wall fabric – what a fate. Our builder agreed that the nests would not cause the house to fall down. The vent bricks made three slices each. They’ll be sheltered by the guttering. Each nest was provided with goose feathers, as ours are still moulting. We haven’t installed cameras nor do we expect to ever be able to get up there again. Over to the swifts. The speaker will be over a bedroom window so we should be able to reach it in case of failure."


Sunday 21 July 2019

Cameras in Swift boxes

Many people insert a camera into their Swift boxes. Normally the only option is to place the camera somewhere between the entrance and the nest, so at no time can you see the whole "stage". Usually the camera is aimed at the nest, and you may be lucky to see some wing tips as the birds peer out of the entrance.

This post is the result of attempts to get better pictures with cameras in nest boxes, particularly in All Saint's Church Landbeach.  It is part of a project to generate interest and awareness of swifts in churches sponsored by British Birds Charitable Trust.

We do 3 things:
  • Modify the nest box so that either the nest is between the camera and the entrance (or so that the entrance is between the camera and the nest)
  • Include white lights
  • Choose an appropriate focal length for the lens.

Nest box modification
In Landbeach church in 2018, 8 boxes were occupied (increased to 11 pairs this year, 2019). We modified 4 of these by extending them with a housing to take a camera. We installed 2 cameras, which are easy to move from one modified box to another. The original boxes had internal dimensions W 200, D 200, H 150 and were positioned behind louvres in the belfry.  The camera housing simply hangs onto the back of the box.

Original nest box with camera housing extension.
White lights
We used analogue cameras from Green Feathers who also supplied the white lights. These cameras are not as high quality as WIFI or IP cameras, but they are certainly easier to deploy. The lights have a sensor so that they are switched on and off suddenly when the sun comes up and goes down. When the lights are off, the camera works in the infrared, producing the familiar ghostly images at night.

Any concerns that the Swifts would be disturbed by sudden changes in light levels were unjustified - they appear to take no notice (similarly, they take no notice of some very loud bell-ringing).

The lights not only enable one to see colour,  they greatly improve the quality of the imagery and they greatly reduce light through the entrance dazzling the camera.

Lens focal length
One needs to choose a focal length compatible with the desired field of view. Too long a focal length will restrict it and too short will mean that things of interest appear too small. We used a focal length of 2.8mm

Example results


Video-clip from 4th July

Video-clip from 20th July

Video-clip from 27th July


Video clip from 26th July - a late returning adult (infrared lighting)

The north side of the belfry with 4 camera boxes on top

Saturday 22 June 2019

An example of how traditional nest sites were preserved during a building renovation project

This is an excellent case study of what can be achieved to preserve and create Swift nest sites in a sensitive situation Many thanks to Lynda Huxley, Swift Conservation Ireland for forwarding.


Lyon's Mill - click to enlarge
Lyons Mill is a landmark historical building in Finisklin in Sligo located just off the town bypass. It is a four-storey mill/warehouse finished in beautiful cut limestone, completed about 1820.

With the decision to build a new LIDL on the site, came the exciting news that the entire Mill building would also be refurbished as part of the project (the new LIDL has been built to the rear of the Lyons Mill site.

The sharp-eyed Will Woodrow of Woodrow Environmental Solutions realised there were Swift nest sites in the building, and a multi-agency collaboration to preserve and improve Swift breeding sites swung into action.

Half-brick nest site entrances were obtained by Swift Conservation Ireland from Action for Swifts in the UK. These half bricks were inserted where ‘traditional’ nest sites were thought to exist and additional ones inserted which means that around 30 Swift nests can now be hosted in the refurbished Mill, a really wonderful outcome. In addition a water proof speaker was inset near the nest site entrances and attraction calls will be played from May to July each year.

Access points and suitable cavities for bats have also been retained.

2 entrances and a built in speaker for attraction calls
If you look hard enough, you can see 3 entrances
The entrances are cast with a 50:50 sand/cement mixture
Sincere thanks to all of the people and organisations who came together to make this happen, in alphabetical order:

Barbara McInerney (Bat Consultant)
BirdWatch Sligo (Micheal Casey)
Carrick Conservation Architects
LIDL Ireland
McCabe Architects (Gary)
McCallion Construction (esp Paul)
National Parks & Wildlife Service (Miriam Crowley)
Sligo Co Council (Siobhán Ryan, Heritage Officer)
Swift Conservation Ireland (Lynda Huxley)

Action for Swifts (Dick Newell)
Woodrow Environmental Solutions (Will Woodrow)

Friday 21 June 2019

Swift Mapper


It has been many years since Geoff Beale set up UK-Swifts to record the locations where swifts breed. Geoff's efforts were taken over by the RSPB and became the Swift Inventory in 2009. Since then a number of other inventory systems have been implemented by local groups and the RSPB system has recently undergone a revamp. All of these systems take their input online and have had a number of differences between them. Now there is a major step forward:


First, there is a new system, Swift Mapper, which is a mobile App from Natural Apptitude

Second, a concerted effort has been made to iron out inconsistencies between the various systems so that data transfer between them is straight forward.

Swift Mapper is a very well put together system, and is a very convenient option for inputing Swift breeding data. In essence Swift Mapper can be a data capture portal to these other online systems.

People who maintain other systems can be given access to Coreo, the data management system underpinning Swift Mapper, to download data for input to their own systems.

Swift Mapper has been live for some time and is working very well. The purpose of this post is to give it a push as we think it could transform the capture of Swift breeding data.

The Android version is available here:
https://play.google.com/store/apps/details?id=com.natural_apptitude.swift_mapper
The iOS version is available here:
https://apps.apple.com/gb/app/swift-mapper/id1405009547

Friday 31 May 2019

Alsager Town Council

This is a news item worthy of replicating in many places. Thank you to Councillor Jane Smith for sending it to us


Left to right: (click to enlarge)
Antony Cook, Alsager Urban Wildlife Initiative
Nicola Clarke, Alsager Town Council clerk
Cllr Jane Smith, Alsager Town Council
At Alsager Town Council in Cheshire we've been helping the town become more ‘swift-friendly’ by installing bespoke nesting boxes for endangered swifts under the eaves of the council offices in the town centre.

Last summer, three special swift nesting boxes were donated as a joint project between myself, Alsager Urban Wildlife Initiative and the local Sustainability Group. Contractors from KDE Ltd. kindly installed the three nesting boxes pro bono while they were using a cherry picker for electrical work on the town council’s offices. Even the installation garnered lots of interest from passers-by, many of whom remarked just how much they'd love to see and hear swifts in Alsager again. We also installed a simple, low-cost speaker system along with the nest boxes on to help attract swifts with recorded calls.

I felt it was really important that we play our part as a local community to help these much-loved birds who give us one of the most iconic natural spectacles of sight and sound each summer, and I think it’s a really progressive move by Alsager Town Council, being a great example of local councils can work with groups of enthusiasts to help wildlife thrive right in the heart of our communities. I hope that other town and parish councils follow suit, as swifts certainly need all the help they can get.

Antony Cook from Alsager Urban Wildlife Initiative says that a small town such as Alsager should easily be able to accommodate several swift colonies. We have lots of trees here as well as a town centre mere, which is fantastic habitat for flying insects. We hope putting up nest boxes on the Town Council building will inspire others to do the same in their homes.

The nest boxes were supplied by CJ Wildlife/Vivara

Tuesday 28 May 2019

Ely Cemetery Chapels

Of all of our swift nest boxing projects this has to be the most attractive and stunning. Built in the mid nineteenth century, the twin chapels are situated on a small hill in attractive mature woodland. It is a most beautiful, peaceful and secluded spot.

The project was suggested to us by Councillor Elaine Griffin-Singh, and approval was quickly forthcoming from Ely City Council. Richard Delahe and his staff enthusiastically embraced the project, and did nearly all of the work installing the boxes.  As we arrived on site, 4 Swifts were repeatedly screaming around the chapels, below head height, and we assumed they must have been already breeding somewhere under the very low eaves.

The belfry, with 8 sides has a single bell, with no way currently of ringing it. The louvres have vertical battens on each side to hold netting that excludes wildlife. Each of 5 swift cabinets replaces a section of netting on 5 louvres and was secured by screws through the sides into these battens. Cabinets on the other 3 sides would have obstructed entry. The belfry now contains 50 nest boxes.

A tweeter playing attraction calls in the middle of the belfry can clearly be heard on all sides

Ely Cemetery twin chapels and tower

5 cabinets with 10 nest chambers each. Every other chamber is painted black inside.
Part of the installation team. From left to right: 
Ben Lather, Dick Newell, Bill Murrells and Richard Delahe


A panorama shot of the boxes by Richard Delahe

The boxes are installed behind the lower part of these louvres


Wednesday 8 May 2019

Shrimp Cottage case study

This case study shows two things: just how small a space a swift can use for a nesting place and how to provide nesting places when roofs are repaired.

by Alan Collett, Aldeburgh's Amazing Swifts

Swifts were seen entering a nest site on a number of occasions in 2018. The owners were advised and asked to contact us should they consider renewing their roof at any time. This they did in February 2019.

Following discussions with the roofing contractors, we were allowed to be present as they removed the pantiles. We were expecting to find the nest within the roof space but actually found it 30cm up the roof slope resting on the narrow batten which supported the tile.

The Swifts had been climbing up the roof felt over the first batten under the arch of the pantile.

 It had then turned left under the tile to the adjacent arch and made its nest on the batten - possibly on an old sparrow’s nest. Cramped and hot!

The headroom would have varied between about 30mm and, perhaps 85mm at the high point of the tile. The headroom over the nest itself may have been about 50mm.

We were planning to reinstate the nest in the same location but as we couldn’t guarantee the original access route to the nest, we looked to re-site the nest within the box section behind the fascia using the same entry point.

The existing entry point was lowered slightly and then built up at the sides to produce a correctly sized entrance hole, over which the felt would lay. The route up the roofing felt was then restricted and the bird ‘made’ to go into the box section behind the fascia and above the soffit with a ramp leading down to the relocated nest.

The felt was trimmed to allow access to the hole and the pantiles replaced.

Another nest site was then created further along the roof.

Time will tell how successful this will have proved, but it does demonstrate that with the cooperation of owners and contractors, a place for wildlife can be incorporated into a building without risking the integrity of the roof.

Our thanks to the owners of
Shrimp Cottage Aldeburgh
and 3A Roofing Ltd Ipswich
A "bridge" has been installed across the gutter
in front of the entrance

Thursday 18 April 2019

Abbots Ripton Hall

Abbots Ripton Hall is a stately home with parapet walls offering ideal opportunities for Swift nest boxes, and it is the home of Lord de Ramsey who is very much a wildlife enthusiast.

For this project we supplied half brick entrance pieces and John Stimpson provided modified Model 30's. Instead of the entrance in the front, a larger rectangular hole was made in the back. The work was undertaken by Gavin Smith and his team.

The parapet is a solid wall, with plenty of headers providing opportunities for Swift boxes. Removing the headers was easy enough, but on the inside, some of the walls were rendered on top of chicken mesh which required cutting away.

8 boxes have been installed in 3 different parts of the parapet. If/when these are successful, there is scope for many more.

From this aspect, all of the boxes are in view, but barely visible
3 out of 8 entrances
Model 30's inside the parapet
Lid off showing access tunnel through the wall.
#parapet

Sunday 14 April 2019

The Cambridge System with circular entrance pieces

This is a nice implementation of the Cambridge System with circular entrance pieces

Thanks for the pictures are due to Graham Fry, who lives near St Neots.

With rendered walls, one cannot see where the bricks are in order to go about removing a brick to make an entrance.  While one could tackle the problem from the inside, one risks making a mess of the render. So making a hole with a  4 inch core drill from the outside is another way of doing it. Then circular entrance pieces neatly fill the hole.

This is a solid wall 9 inches thick, but a 4 inch core drill is an efficient way to make a hole all of the way through.

Making holes with a 4inch core drill
Entrance pieces inserted
Nest boxes installed.
A circular entrance piece
#cambridge

Saturday 13 April 2019

First installation of retrofitted S Bricks

These are the first pictures of retrofitted S Bricks. The S Brick is particularly suited for retrofit as it spans just one course of bricks, and, normally is confined to the outer leaf and the cavity, though this first installation was slightly different.

John Hunt in Northants already has Swifts breeding in a Zeist and a Model 30 on his gable, so he decided to give the S Brick a go. The boxes are at a level where there is an unheated room, and John wanted access to the boxes from the inside.  As the S Brick is made on a laser cutter, it can be tailored to fit the space available, so it was easy to adjust the depth of the box to bridge the cavity and inner leaf. In this case, the cavity was 60mm, so extra floor area needed to be found somehow. The floor area is 475 sq cm and headroom is 80mm, quite a bit larger than our successful experimental swift bricks

Although essentially straightforward, it was not as easy as it should have been because of a measurement miscommunication, a sliver of brick required trimming with an angle grinder.

Normally the back of the S Brick is closed, but we cut a rectangular hole to allow for a removable door. It also allows for a perspex back and a camera in due course.

S Brick with brick slip cast out of sand and cement.
Note clear labelling of Top (and Bottom)

S Brick rear view showing the nest form.The open back was a tailored feature for this implementation.

2 S Bricks installed. A reasonable colour match was achieved with some red dye.

Distant view of gable

Internal view of installed S Brick with Velcro surround
Backs installed

#sbox