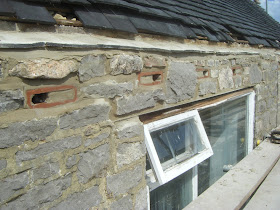
When one installs internal boxes, one should try to either make them unobtrusive or an attractive feature.
One of the first internal swift box projects we did in 2014 used a 30mm wide cavity liner which we cut into pieces and then reassembled into a half-brick entrance (see here). Then in 2016 Barbara Wager installed internal boxes in a stone wall with a system of entrances cast in situ (see here).
Here, Barbara has combined these 2 ideas resulting in a practical solution that is simple, effective and attractive.
In her own words:
"The nest boxes were made by taking out facing stones, inserting the vent brick slices, mortaring in with tiles over the entrance and then vaselined formers were mortared in. Inside they are quite roomy and the walls mortared to prevent chicks wandering into the wall fabric – what a fate. Our builder agreed that the nests would not cause the house to fall down. The vent bricks made three slices each. They’ll be sheltered by the guttering. Each nest was provided with goose feathers, as ours are still moulting. We haven’t installed cameras nor do we expect to ever be able to get up there again. Over to the swifts. The speaker will be over a bedroom window so we should be able to reach it in case of failure."


